Nothing tests your willpower like Halloween. Everything at hand is both delicious and terrible for you. And since it’s just one day, is a day-long sugar binge really all that bad?
Unfortunately, yes—because it’s never just that one day. The holiday season is upon us and Halloween marks the beginning of our collective descent into the depths of seasonal, socially-acceptable gluttony. All those surreptitious snacks add up in a big way, and not just in terms of empty calories. They’re full of synthetic dyes, preservatives, artificial flavors, and inflammation-promoting refined sugar.
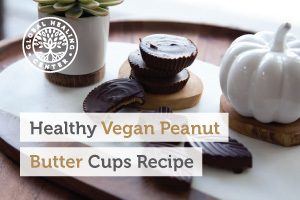
My strongest craving is for peanut butter cups. It just doesn’t feel like Halloween without peanut butter cups, but if you’ve ever read the label, you know better than to eat the store-bought kind. You can do so much better by making your own vegan peanut butter cups instead.
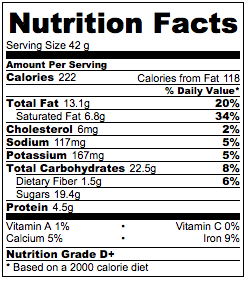
Homemade peanut butter cups can have healthier chocolate, and less than half the calories (that doesn’t mean you should eat twice as many!). These peanut butter cups taste great and will satisfy any craving for sweets. In this recipe, I used 60% cocoa dark chocolate and the results were incredibly rich and satisfying, especially if you’re generous with the organic natural peanut butter. Once you’ve eaten peanut butter cups made with high quality (not to mention antioxidant-rich) chocolate, you won’t even want the cheap, mass-produced faux-chocolate and peanut-butterish polyglycerol polyricinoleate products the big candy manufacturers make.
The Origin and Politics of Peanut Butter
Peanut butter seems to be a uniquely American phenomenon, but peanuts, which are actually a legume, are eaten throughout the world. Originating in eastern Bolivia, the plant spread throughout South America and the Caribbean well before Spanish explorers first noted the “discovery” of peanuts in 1502 on the island of Hispaniola. From here, peanuts traveled back to Spain and then on to Africa.[1]
In the 1700s, peanuts were introduced to the United States by way of the African slave trade. Peanuts were even a food ration for slaves during the treacherous Middle Passage.[2] Once in the US, peanuts were still regarded as a food for slaves, the poor, and livestock. The peanut didn’t shake this reputation until the Civil War, at which point undernourished Confederate soldiers relied on the humble, fatty, high-protein food. Peanuts became an essential part of Confederate soldiers’ diets, but they did not eat peanut butter. Instead, southerners enjoyed roasted peanuts which are still a favorite southern snack.[3]
We actually have John Harvey Kellogg, known for Kellogg cereal, to thank for expanding the popularity of peanut butter in the 19th century.[4] Crushed, steamed peanut paste was originally intended as a no-chew, protein-rich food for sanitarium patients. It became popular among the upper classes when wealthy former patients returned home. At this point, peanut butter still hadn’t reached the masses.[5]
This changed with hydrogenation, however. In 1923, Heinz became the first food manufacturer to add hydrogenated oil to peanut butter, which improved shelf stability and solved the oil separation problem. Peanut butter was finally available to everyone, but the hydrogenated oil content kept increasing. Some brands contained as much as 25% hydrogenated oil and only 75% peanut butter.[6]
For 12 years, the FDA and food manufacturers argued over the appropriate percentage of peanuts that peanut butter must contain. Ultimately, peanut butter was defined as a product that contained at least 90% peanuts, and not more than 10% optional ingredients, such as salt, oil, and sugar. As we all now know, the trans fat content in hydrogenated oil is terrible for heart health.[6] Since trans fats are on their way out of the American food supply, we’ve seen a shift back to “natural” peanut butter, which should only contain crushed peanuts and a little salt.
Unfortunately, many peanut butter makers are now adding palm oil, a saturated fat, into their no-stir peanut butter.[7] I strongly recommend the old-fashioned peanut butter, the kind with oil separation—all you have to do is stir it. It has a better texture and a more peanutty taste than hydrogenated or palm oil peanut butter. Not only is palm oil ecologically unsustainable and mired in controversy,[8, 9] it also makes peanut butter greasy and less palatable. I used natural peanut butter (just peanuts and salt) in this recipe and it worked like a dream.
Read This Before Working With Chocolate
First and foremost—wear an apron, you won’t regret it. Chocolate stained clothes are no joke! Try to avoid using a cloth kitchen towel. Chocolate can be very messy and once it solidifies it’s difficult to wash out; you’re better off using paper towels and lining your work surface with wax paper.
Take care that you don’t get ANY water in your chocolate—water ruins chocolate. If you do make this mistake, DO NOT MIX the water into the chocolate, it will get ugly and strangely chunky. Just quickly grab a spoon and scoop out all the water and the afflicted chocolate.
Vegan Peanut Butter Cups Recipe
- Prep time: 20 minutes
- Cooling time: 15-20 minutes, depending on the chocolate
- Total time: 35 minutes
- Servings: 9 Servings

Ingredients
- ⅓ cup organic peanut butter, stirred to incorporate oil
- 3 tbsp of fine coconut sugar
- ½ tsp pure organic vanilla extract
- ¼ tsp Himalayan crystal salt
- 1 ½ cups vegan chocolate chips
Equipment
- Apron, highly recommended
- Wax paper, optional
- Double boiler, or oven safe bowl and pot
- Chopstick
- Silicone spatula
- Cupcake liners or chocolate molds
Instructions
- Start by melting the chocolate chips on medium-low heat in your double boiler. This will take about 10-15 minutes. Stay aware of its progress and stir occasionally.
- While the chocolate is melting, stir the peanut butter, coconut sugar, vanilla, and salt together in a clean bowl, this should only take a minute. Once a peanut butter dough forms, pop the bowl in the freezer to make the dough slightly easier handle. You’ll remove it for step 5.
- Stir your melting chocolate using a chopstick or small silicone spatula until all the chips have completely melted into a liquid. If this takes more than a few minutes, you can turn the stove up to medium for a minute or two to melt the chips faster.
- Once the chocolate has thoroughly melted, remove it from the heat and set the container with the melted chocolate in your work area. Carefully pour a thin layer of chocolate into cupcake liners. Use a small spoon or your chopstick to smooth the chocolate into an even layer. Keep your chocolate warm by setting the container over the hot water again.
- Grab your peanut butter dough from the freezer. Pinch off pieces and roll into balls, flatten them into discs that are slightly smaller than the mold. Carefully place peanut butter layer over chocolate.
- Pour and smooth remaining chocolate into liners or molds. If you’re using cupcake liners, use your chopstick to swirl the top of the chocolate so it doesn’t look lumpy or uneven.
- Carefully place your peanut butter cups in the fridge to cool for at least 20 minutes. Then you’re free to enjoy!
Tips for Working with Chocolate
This project is easiest if you have a double boiler, but it’s not a must. If you don’t have a double boiler, just put an oven-safe bowl in a pot with a few inches of water and melt your chocolate there. Once the chocolate has thoroughly melted, use a sturdy utensil like a wooden spoon to lift your bowl clear of the water and the steam. Grab your bowl with either a folded paper towel or a silicone mitt.
The melted chocolate might not spread evenly (or at all) when you pour it into your cupcake liners or molds. Just use a chopstick or spoon to flatten the dollop out. Take care to cover the entire bottom in an even layer when you spread the chocolate. Try to make the chocolate layers as thin as possible. If you accidentally pour too much, just press your peanut butter dough down a bit when you add it to the liner or mold.
Have you tried making your own chocolates or peanut butter cups? Leave a comment and let us know how it went!
References
- Smith, Andrew F. Peanuts: The Illustrious History of the Goober Pea (the Food Series). N.p.: University of Illinois Press, 2006. Book.
- Palmer, Brian. Why Do Americans Love Peanut Butter?. Slate Magazine, 9 Feb. 2009. Web. 19 Oct. 2016.
- Moss, Robert, and Serious Eats. “The Real Origins of the Boiled Peanut.” N.p., 12 Aug. 2015. Web. 19 Oct. 2016.
- Texas, State of. Dr. John Harvey Kellogg – Inventor of Kellogg’s Corn Flakes. UT health science center library. Sept. 2016. Web. 19 Oct. 2016.
- Michaud, Jon, et al. “A CHUNKY HISTORY OF PEANUT BUTTER” Page-Turner. The New Yorker, 16 July 2014. Web. 19 Oct. 2016.
- Hamblin, James. “The Quest for Purity Through Peanut Butter.” The Atlantic, 23 June 2016. Web. 19 Oct. 2016.
- Tracy, Erika. What Is Natural Peanut Butter? — grower tour. The Kitchn, 29 Oct. 2014. Web. 19 Oct. 2016.
- Schaeffer, Ashley, and Rainforest Action Network. Palm Oil is Causing Mass Deforestation, Killing Animals – and It’s Making Us Sick. One Green Planet, 2016. Web. 19 Oct. 2016.
- Neslen, Arthur. “Greenpeace Blockades IOI Palm Oil Refinery in Rotterdam Port.” The Guardian. The Guardian, 28 Sept. 2016. Web. 19 Oct. 2016.
The post Healthy Vegan Peanut Butter Cups Recipe appeared first on Dr. Group's Natural Health & Organic Living Blog.
source http://www.globalhealingcenter.com/natural-health/healthy-vegan-peanut-butter-cups-recipe/
No comments:
Post a Comment